※ Red Hat Enterprise Linux 7 互換である CentOS 7 ( 2014年07月07日リリース, 2024年06月末までサポート予定 ) による私なりのWebサーバーの構築方法です。皆さんの環境に合わせて、読みかえて下さい。私はNTT東日本さんのフレッツ光ネクストを回線として使っていて、ダイナミックDNSのサービスとして、DDO.JPさんを使っています。ASAHI-netさんから割り振られるIPを使っていますので、別の固定IPアドレスサービスは追加していません。ドメインレジストラはお名前.comさんを利用しています。
※この方法は「FireWall」「SELINUX」その他のセキュリティソフトやセキュリティ対策を行うことは考えて書かれておりません。ご利用になる際はその点をご理解の上、ご自身の責任で行って下さい。当方では責任は取れません。
【CentOS 7 のインストール】
●Windows10Proを用い、理研のサイトから、CentOS,7.9の最新版をダウンロードする。
●CentOS-7-x86_64-Everything-2009.iso ←最新版を使う。古いとうまくいかないことが多い。私の時はこれが最新版だった。
●ダウンロードしたisoファイルを新しいBD-Rに焼く。
●出来上がった CentOS7,x86_64用BD-R からインストールする。
●2TBのHDD2枚、BIOSで、RAID1使用。 ←私のサーバーの仕様です。
●BIOSで、BDからの起動を選択、再起動。
≪インストーラに従い、下記のように選択≫
○インストール時に使用する言語「English(United States)」
○キーボード:「日本語, English(US)」
○言語サポート:「English(United States)」
○ネットワーク設定:NIC「enp5s0」のIPv4を下記設定、IPv6を「無視する」
IPアドレス:「192.168.1.50」 ←自分のLAN内でのIPアドレスに読みかえて下さい。
ネットマスク:「255.255.255.0」
ゲートウェイ:「192.168.1.1」←自分のLAN内でのゲートウェイアドレスに読みかえて下さい。
DNS:「192.168.1.1」 ←これにASAHI-netとDDOのDNS(2つずつ)を足す。
ドメインを検索:「your-domain.com」
ホスト名を「localhost.localdomain」から、「your-domain.com」に変更。
○日付と時間:「アジア」「東京」「Network Time」
○インストールソース:「ローカルメディア」
○ソフトウェアの選択:
ベース環境:「BASICサーバー(GUI)」
選択した環境のアドオン:すべてチェックしない。
○インストール先:すべてのパーティションを削除し、「自動パーティション」
すべての領域を使用する。
○インストールを開始
○パスワード設定
root
ID:root
パスワード:password1
user2
ID:user2
パスワード:password2
このユーザーを管理者にしない
○インストール最後の設定
インストールBD-REを取り出す。
ライセンス同意して、再起動する。
【CentOS 7 インストール後の設定】
●日本語・日本語かな漢字・英語→入力を追加する。
●サウンドのアイコンから[サウンドの設定]で最大にする。
●[アクティビティ]→[アプリケーション]→[設定]→[電源]→[操作していない時に画面を暗くする]を15分に。
●[ブランクスクリーン]をしないにしウインドウを閉じる。
≪ここから Windows10Pro 端末から teraterm(telnet) でリモートコントロール≫
●hostsファイルの編集
# vi /etc/hosts
## 2022.08.26(Sat) Changed ## ←いつのものか書いておくと良い。
127.0.0.1 localhost localhost.localdomain localhost4 localhost4.localdomain4
::1 localhost localhost.localdomain localhost6 localhost6.localdomain6
192.168.1.1 gateway.localnet ##
192.168.1.50 your-domain.com ## Linux Server
192.168.1.*** windows.localnet ## Windows 10 Pro
***.***.***.*** # ASAHI-net DNS1 Server
***.***.***.*** # ASAHI-net DNS2 Server
***.***.***.*** # DDO.JP DNS1 Server
***.***.***.*** # DDO.JP DNS2 Server
●SELinux (Security-Enhanced Linux)の設定変更
# vi /etc/selinux/config を変更。
# This file controls the state of SELinux on the system.
# SELINUX= can take one of these three values:
# enforcing – SELinux security policy is enforced.
# permissive – SELinux prints warnings instead of enforcing.
# disabled – No SELinux policy is loaded.
#SELINUX=enforcing
#SELINUX=disabled
SELINUX=permissive
# SELINUXTYPE= can take one of three values:
# targeted – Targeted processes are protected,
# minimum – Modification of targeted policy. Only selected processes are protected.
# mls – Multi Level Security protection.
SELINUXTYPE=targeted
●Firewalld ←個人で適切な設定にして下さい。
# systemctl stop firewalld
# systemctl disable firewalld
に変更。再起動。
# reboot
●ネットワークの設定(要確認) ←デバイス名(enp5s0)は自分の物と読みかえて下さい。
# nmcli device
DEVICE TYPE STATE CONNECTION
enp5s0 ethernet connected enp5s0
virbr0 bridge connected virbr0
lo loopback unmanaged —
virbr0-nic tun unmanaged —
# nmcli device show enp5s0
GENERAL.DEVICE: enp5s0
GENERAL.TYPE: ethernet
GENERAL.HWADDR: BC:5F:F4:65:EB:80
GENERAL.MTU: 1500
GENERAL.STATE: 100 (connected)
GENERAL.CONNECTION: enp5s0
GENERAL.CON-PATH: /org/freedesktop/NetworkManager/ActiveConnection/1
WIRED-PROPERTIES.CARRIER: on
IP4.ADDRESS[1]: 192.168.1.50/24
IP4.GATEWAY: 192.168.1.1
IP4.ROUTE[1]: dst = 192.168.1.0/24, nh = 0.0.0.0, mt = 100
IP4.ROUTE[2]: dst = 0.0.0.0/0, nh = 192.168.1.1, mt = 100
IP4.DNS[1]: 192.168.1.1
IP6.ADDRESS[1]: 2405:6582:7e0:4600:3aff:6dd7:bc08:470a/64
IP6.ADDRESS[2]: fe80::667f:b565:86c0:55c6/64
IP6.GATEWAY: fe80::3ae0:8eff:fef2:e10c
IP6.ROUTE[1]: dst = 2405:6582:7e0:4600::/64, nh = ::, mt = 100
IP6.ROUTE[2]: dst = ::/0, nh = fe80::3ae0:8eff:fef2:e10c, mt = 100
IP6.ROUTE[3]: dst = fe80::/64, nh = ::, mt = 100
IP6.ROUTE[4]: dst = ff00::/8, nh = ::, mt = 256, table=255
【 DNS 設定】
●BINDの導入
# yum -y install bind bind-utils
○BINDの設定
○named.confを編集する。
# vi /etc/named.conf
//
// named.conf
//
// Provided by Red Hat bind package to cousergure the ISC BIND named(8) DNS
// server as a caching only nameserver (as a localhost DNS resolver only).
//
// See /usr/share/doc/bind*/sample/ for example named couserguration files.
//
// See the BIND Administrator’s Reference Manual (ARM) for details about the
// couserguration located in /usr/share/doc/bind-{version}/Bv9ARM.html
options {
listen-on port 53 { any; };
listen-on-v6 { none; };
directory “/var/named”;
dump-file “/var/named/data/cache_dump.db”;
statistics-file “/var/named/data/named_stats.txt”;
memstatistics-file “/var/named/data/named_mem_stats.txt”;
recursing-file “/var/named/data/named.recursing”;
secroots-file “/var/named/data/named.secroots”;
allow-query { localhost; };
allow-transfer { localhost; };
/*
– If you are building an AUTHORITATIVE DNS server, do NOT enable recursion.
– If you are building a RECURSIVE (caching) DNS server, you need to enable
recursion.
– If your recursive DNS server has a public IP address, you MUST enable access
control to limit queries to your legitimate users. Failing to do so will
cause your server to become part of large scale DNS amplification
attacks. Implementing BCP38 within your network would greatly
reduce such attack surface
*/
recursion yes;
dnssec-enable yes;
dnssec-validation yes;
dnssec-lookaside auto;
/* Path to ISC DLV key */
bindkeys-file “/etc/named.iscdlv.key”;
managed-keys-directory “/var/named/dynamic”;
pid-file “/run/named/named.pid”;
session-keyfile “/run/named/session.key”;
};
logging {
channel default_debug {
file “data/named.run”;
severity dynamic;
};
};
view “internal” {
match-clients {
localhost;
192.168.1.50/24;
};
zone “.” IN {
type hint;
file “named.ca”;
};
zone “your-domain.com” IN {
type master;
file “your-domain.com.lan”;
allow-update { none; };
};
zone “1.168.192.in-addr.arpa” IN {
type master;
file “1.168.192.db”;
allow-update { none; };
};
include “/etc/named.rfc1912.zones”;
include “/etc/named.root.key”;
};
○内部向け正引き情報の設定ファイル作成
# vi /var/named/your-domain.com.lan
$TTL 86400
@ IN SOA your-domain.com. root.your-domain.com. (
20220826 ;Serial
3600 ;Refresh
1800 ;Retry
604800 ;Expire
86400 ;Minimum TTL
)
IN NS your-domain.com.
IN A 192.168.1.50
IN MX 10 your-domain.com.
IN A 192.168.1.50
○内部向け逆引きの設定ファイル作成
# vi /var/named/1.168.192.db
$TTL 86400
@ IN SOA your-domain.com. root.your-domain.com. (
20220826 ;Serial
3600 ;Refresh
1800 ;Retry
604800 ;Expire
86400 ;Minimum TTL
)
IN NS your-domain.com.
IN PTR your-domain.com.
IN A 255.255.255.0
50 IN PTR your-domain.com.
○BIND の起動
# systemctl start named
# systemctl enable named
≪DDO.JP利用≫(サーバーのブラウザでログイン)—————————– ここから
●http://ddo.jp/
に、登録ドメイン:your-domain.com
メールアドレス:あなたのメールアドレス
パスワード:password2
で、ログイン。
≪お名前.com利用≫(Windows 10 pro PCを用いて)
●お名前.comで、ネームサーバーの変更
https://navi.onamae.com/domain/setting/ns ←ログインには、お名前.com のアカウントが必要
●DNSとして、
ネームサーバー 1 : DDO.JP DNS1 Server の IPアドレス
ネームサーバー 2 : DDO.JP DNS2 Server の IPアドレス
●ネットワーク設定のDNSに以下のIPアドレスを追記(確認)
# nmcli device show enp5s0
●クーロンを利用する。(DDO.JP利用のため、ipの指定はしない)
# crontab -e
*/15 * * * * wget -O – ‘https://ddo.jp/dnsupdate.php?dn=your-domain.com’
『反映に最大72時間かかる』
————————————————————————- ここまでは個人の裁量にお任せします。
○正引きの確認
# dig your-domain.com
○逆引きの確認
# dig -x 192.168.1.50
【 FTP 設定】
●vsftpd の利用
# yum -y install vsftpd
○vsftpd.confを編集する。
# vi /etc/vsftpd/vsftpd.conf
# 12行目:匿名ログイン禁止
anonymous_enable=NO
# 80,81行目:コメント解除 ( アスキーモードでの転送を許可 )
ascii_upload_enable=YES
ascii_download_enable=YES
# 95,96行目:コメント解除 ( chroot有効 )
chroot_local_user=YES
chroot_list_enable=YES
# 98行目:コメント解除 ( chroot リストファイル指定 )
chroot_list_file=/etc/vsftpd/chroot_list
# 104行目:コメント解除 ( ディレクトリごと一括での転送有効 )
ls_recurse_enable=YES
# 114行目:変更 ( IPv4をリスンする )
listen=YES
# 123行目:変更 ( もし不要なら IPv6 はリスンしない )
listen_ipv6=NO
●FTPを使うユーザーを登録しておく
# vi /etc/vsftpd/chroot_list
root
user2
●起動
# systemctl start vsftpd
# systemctl enable vsftpd
【送信メールサーバー 設定】
●postfixのインストール
# yum -y install postfix
●postfixの設定
○main.cfを編集する。
# vi /etc/postfix/main.cf
# 75行目:コメント解除しホスト名指定
myhostname = your-domain.com
#myhostname = virtual.domain.tld
# 83行目:コメント解除しドメイン名指定
mydomain = your-domain.com
# 99行目:コメント解除
myorigin = $mydomain
# 116行目:変更
inet_interfaces = all
# 164行目:追記
mydestination = $myhostname, localhost.$mydomain, localhost, $mydomain
# 264行目:コメント解除し自ネットワーク追記
mynetworks = 168.100.189.0/28, 127.0.0.0/8, 192.168.1.0/24
# 419行目:コメント解除しMaildir形式へ移行
home_mailbox = Maildir/
# 574行目:追記
smtpd_banner = $myhostname ESMTP
##ADD## ←最終行に以下を加える
# for SMTP-Auth
smtpd_sasl_type = dovecot
smtpd_sasl_path = private/auth
smtpd_sasl_auth_enable = yes
smtpd_sasl_security_options = noanonymous
smtpd_sasl_local_domain = $myhostname
smtpd_recipient_restrictions = permit_mynetworks, permit_auth_destination, permit_sasl_authenticated, reject
# 起動
# systemctl start postfix
# systemctl enable postfix
【受信メールサーバー 設定】
●dovecotのインストール
# yum -y install dovecot
●dovecotの設定
○設定ファイルの編集
# vi /etc/dovecot/dovecot.conf
# line 24: uncomment
protocols = imap pop3 lmtp
# line 30: uncomment and change ( if not use IPv6 )
listen = *
○設定ファイルの編集
# vi /etc/dovecot/conf.d/10-auth.conf
# line 10: uncomment and change ( allow plain text auth )
disable_plaintext_auth = no
# line 100: add
auth_mechanisms = plain login
○設定ファイルの編集
#vi /etc/dovecot/conf.d/10-mail.conf
# line 30: uncomment and add
mail_location = maildir:~/Maildir
○設定ファイルの編集
# vi /etc/dovecot/conf.d/10-master.conf
# line 96-98: uncomment and add
# Postfix smtp-auth
unix_listener /var/spool/postfix/private/auth {
mode = 0666
user = postfix # add
group = postfix # add
}
○設定ファイルの編集
# vi /etc/dovecot/conf.d/10-ssl.conf
# line 8: change (not require SSL)
ssl = no
●起動
# systemctl start dovecot
# systemctl enable dovecot
[ root アカウント宛のメールの転送設定 ]———————————- ここから
〇root ユーザー宛に送られてくるメールを一般ユーザーに転送する(例として [user2] ユーザーに転送)
# vi /etc/aliases
# Person who should get root’s mail
# 最終行頭の#を削除し転送するユーザー名に変更
root: user2
〇設定の変更を反映
# newaliases
————————————————————————- ここまでは個人の裁量にお任せします。
【 WordPress 導入の前提条件】
● Apache2.4 と PHP8.0 と MariaDB10.8 が準備できた状態に WordPress の最新版をインストールします。
【 Apache httpd のインストール】
httpd -v コマンドでApache httpd のバージョン確認します。
# httpd -v
Server version: Apache/2.4.54 (IUS)
Server built: Jul 20 2022 23:47:24
新しいバージョンが入っているようです。
もしも、バージョンが古いようでしたら、一度、httpdをアンインストールしてみましょう。
httpd 停止・削除
# systemctl stop httpd
# yum remove httpd
# yum remove httpd-tools
入ってなければインストール
# yum -y install httpd
Loaded plugins: fastestmirror, langpacks
Loading mirror speeds from cached hostfile
・・・略・・・
Complete!
設定します。
# vi /etc/httpd/conf/httpd.conf
# 86行目:管理者アドレス指定
ServerAdmin user2@your-domain.com
# 95行目:コメント解除しサーバー名指定
ServerName your-domain.com:80
# 144行目
Options Indexes FollowSymLinks を
Options FollowSymLinks とする。
# 151行目:変更
AllowOverride All
# 164行目:ディレクトリ名のみでアクセスできるファイル名を追記
DirectoryIndex index.html index.cgi index.php
##ADD## 最終行に追記
ServerTokens Prod
KeepAlive On
再起動
# systemctl restart httpd
# systemctl enable httpd
http://192.168.1.50/
で、起動している画面を(リモート)ブラウザで確認できます。
【 PHP のインストール】
php -v コマンドで php のバージョン確認します。
# php -v
bash: php: command not found…
インストールします。
# yum -y install http://rpms.famillecollet.com/enterprise/remi-release-7.rpm
# yum -y install −−enablerepo=remi-php80 php80 php80-php php80-php-xml php80-php-xmlrpc php80-php-pecl-mcrypt php80-php-fpm php80-php-pecl-apcu php80-php-mbstring php80-php-gd php80-php-json php80-php-pecl-json-post php80-php-pdo php80-php-mysqlnd php80-php-pecl-mysql php80-php-opcache php80-php-pear php80-php-soap php80-php-intl php80-php-pear
確認します。
# php -v
bash: php: command not found…
となったら、php80の場所を確認します。
# which php80
/usr/bin/php80
シンボリックリンクを貼ります。
# ln -sf /usr/bin/php80 /usr/bin/php
# php -v
PHP 8.0.22 (cli) (built: Aug 2 2022 08:01:15) ( NTS gcc x86_64 )
Copyright (c) The PHP Group
Zend Engine v4.0.22, Copyright (c) Zend Technologies
with Zend OPcache v8.0.22, Copyright (c), by Zend Technologies
認識されました。これだけでは WordPressが 動かないので、php.ini を編集します。
※私はこの php.ini の編集を行わないでながいことエラーに悩んだ経験があります。
php.iniの場所を確認しましょう。
# php -i | grep php.ini
Configuration File (php.ini) Path => /etc/opt/remi/php80
Loaded Configuration File => /etc/opt/remi/php80/php.ini
viエディタで編集
# vi /etc/opt/remi/php80/php.ini
どこに下記の記載があるかわからない時は「/」の後に検索したい文字列を入れます。
例えば、
/date.timezone
で、[Enter]すると、該当する文字列が表示されます。以下の設定にかえて下さい。
行頭に「;」があるときは削除して下さい。そのままだとコメントアウトされます。
date.timezone = “Asia/Tokyo”
mbstring.language = Japanese
mbstring.internal_encoding = utf-8
mbstring.http_input = utf-8
mbstring.http_output = pass
mbstring.encoding_translation = Off
mbstring.detect_order = utf-8
mbstring.substitute_character = none
# systemctl restart httpd
# systemctl enable httpd
【 MariaDB のバージョン確認】
# yum list installed | grep mariadb
mariadb-libs.x86_64 1:5.5.68-1.el7 @anaconda
古いバージョンの MariaDB が確認されたら、削除します。
# yum remove mariadb-libs
【 MariaDB のインストール】
参照サイト https://mariadb.com/ja/resources/blog/install-mariadb-server-centos7/
# curl -sS https://downloads.mariadb.com/MariaDB/mariadb_repo_setup | sudo bash
# [info] Checking for script prerequisites.
# [warning] Found existing file at /etc/yum.repos.d/mariadb.repo. Moving to /etc/yum.repos.d/mariadb.repo.old_1
# [info] MariaDB Server version 10.9 is valid
# [info] Repository file successfully written to /etc/yum.repos.d/mariadb.repo
# [info] Adding trusted package signing keys…
/etc/pki/rpm-gpg /etc/yum.repos.d
/etc/yum.repos.d
# [info] Successfully added trusted package signing keys
# [info] Cleaning package cache…
Loaded plugins: fastestmirror, langpacks
Existing lock /var/run/yum.pid: another copy is running as pid 2895.
Another app is currently holding the yum lock; waiting for it to exit…
The other application is: PackageKit
Memory : 32 M RSS (451 MB VSZ)
Started: Fri Aug 26 17:06:19 2022 – 00:02 ago
State : Sleeping, pid: 2895
Another app is currently holding the yum lock; waiting for it to exit…
The other application is: PackageKit
Memory : 37 M RSS (458 MB VSZ)
Started: Fri Aug 26 17:06:19 2022 – 00:04 ago
State : Running, pid: 2895
Another app is currently holding the yum lock; waiting for it to exit…
The other application is: PackageKit
Memory : 49 M RSS (1.4 GB VSZ)
Started: Fri Aug 26 17:06:19 2022 – 00:06 ago
State : Sleeping, pid: 2895
Another app is currently holding the yum lock; waiting for it to exit…
The other application is: PackageKit
Memory : 49 M RSS (1.4 GB VSZ)
Started: Fri Aug 26 17:06:19 2022 – 00:08 ago
State : Sleeping, pid: 2895
Another app is currently holding the yum lock; waiting for it to exit…
The other application is: PackageKit
Memory : 80 M RSS (1.4 GB VSZ)
Started: Fri Aug 26 17:06:19 2022 – 00:10 ago
State : Running, pid: 2895
Another app is currently holding the yum lock; waiting for it to exit…
The other application is: PackageKit
Memory : 275 M RSS (1.6 GB VSZ)
Started: Fri Aug 26 17:06:19 2022 – 00:12 ago
State : Running, pid: 2895
Another app is currently holding the yum lock; waiting for it to exit…
The other application is: PackageKit
Memory : 275 M RSS (1.6 GB VSZ)
Started: Fri Aug 26 17:06:19 2022 – 00:14 ago
State : Sleeping, pid: 2895
Another app is currently holding the yum lock; waiting for it to exit…
The other application is: PackageKit
Memory : 275 M RSS (1.6 GB VSZ)
Started: Fri Aug 26 17:06:19 2022 – 00:16 ago
State : Sleeping, pid: 2895
Another app is currently holding the yum lock; waiting for it to exit…
The other application is: PackageKit
Memory : 275 M RSS (1.6 GB VSZ)
Started: Fri Aug 26 17:06:19 2022 – 00:18 ago
State : Running, pid: 2895
Cleaning repos: base epel extras mariadb-main mariadb-maxscale mariadb-tools remi-safe updates
Cleaning up list of fastest mirrors
Other repos take up 600 k of disk space (use –verbose for details)
# yum -y install MariaDB-server
/etc/my.cnf.d/server.cnf の [mariadb] セクションに以下の設定を追加します。
[mariadb]
character-set-server=utf8
# systemctl start mariadb
# systemctl enable mariadb
# mariadb-secure-installation
NOTE: RUNNING ALL PARTS OF THIS SCRIPT IS RECOMMENDED FOR ALL MariaDB
SERVERS IN PRODUCTION USE! PLEASE READ EACH STEP CAREFULLY!
In order to log into MariaDB to secure it, we’ll need the current
password for the root user. If you’ve just installed MariaDB, and
haven’t set the root password yet, you should just press enter here.
Enter current password for root (enter for none):
OK, successfully used password, moving on…
Setting the root password or using the unix_socket ensures that nobody
can log into the MariaDB root user without the proper authorisation.
You already have your root account protected, so you can safely answer ‘n’.
Switch to unix_socket authentication [Y/n] n
… skipping.
You already have your root account protected, so you can safely answer ‘n’.
Change the root password? [Y/n] n
… skipping.
By default, a MariaDB installation has an anonymous user, allowing anyone
to log into MariaDB without having to have a user account created for
them. This is intended only for testing, and to make the installation
go a bit smoother. You should remove them before moving into a
production environment.
Remove anonymous users? [Y/n] y
… Success!
Normally, root should only be allowed to connect from ‘localhost’. This
ensures that someone cannot guess at the root password from the network.
Disallow root login remotely? [Y/n] n
… skipping.
By default, MariaDB comes with a database named ‘test’ that anyone can
access. This is also intended only for testing, and should be removed
before moving into a production environment.
Remove test database and access to it? [Y/n] y
– Dropping test database…
… Success!
– Removing privileges on test database…
… Success!
Reloading the privilege tables will ensure that all changes made so far
will take effect immediately.
Reload privilege tables now? [Y/n] y
… Success!
Cleaning up…
All done! If you’ve completed all of the above steps, your MariaDB
installation should now be secure.
Thanks for using MariaDB!
【 MariaDB 利用方法】
# root で接続確認
# mysql -u root -p
Enter password: # root に設定したパスワード「password1」で認証
Welcome to the MariaDB monitor. Commands end with ; or g.
Your MariaDB connection id is 8
Server version: 10.9.2-MariaDB MariaDB Server
Copyright (c) 2000, 2018, Oracle, MariaDB Corporation Ab and others.
Type ‘help;’ or ‘h’ for help. Type ‘c’ to clear the current input statement.
MariaDB [(none)]>
WordPress用データベース「wp」を作成、権限を「user2」に与える。
MariaDB [(none)]> grant all on *.* to root@localhost identified by ‘password1′;
MariaDB [(none)]> grant all on *.* to root@’%’ identified by ‘password1’;
MariaDB [(none)]> create database wp;
MariaDB [(none)]> grant all on wp.* to user2@localhost identified by ‘password2’;
MariaDB [(none)]> flush privileges;
MariaDB [(none)]> exit
Bye
再起動します。
# systemctl restart mariadb
# systemctl enable mariadb
【 WordPress のインストール】
http://192.168.1.50/
を(リモート)ブラウザで確認したら、Apacheの画面が出てきました。
ウェルカムページを削除します。
# rm -f /etc/httpd/conf.d/welcome.conf
/var/wwwにて、
# wget https://ja.wordpress.org/latest-ja.tar.gz
–2022-08-26 17:49:50– https://ja.wordpress.org/latest-ja.tar.gz
Resolving ja.wordpress.org (ja.wordpress.org)… 198.143.164.252
Connecting to ja.wordpress.org (ja.wordpress.org)|198.143.164.252|:443… connected.
HTTP request sent, awaiting response… 200 OK
Length: 21977713 (21M) [application/octet-stream]
Saving to: ‘latest-ja.tar.gz’
100%[==================================================================================================>] 21,977,713 6.71MB/s in 3.1s
2022-08-26 17:49:54 (6.71 MB/s) – ‘latest-ja.tar.gz’ saved [21977713/21977713]
となったので解凍します。
# tar xvf latest-ja.tar.gz
# ls
cgi-bin html latest-ja.tar.gz wordpress
「html」をいったん削除し、「wordpress」を「html」に変更します。
# rm -RI html
rm: remove 1 argument recursively? y
# mv wordpress html
「html」の所有者を「apache」に変更します。
# chown -R apache.apache html
念のため、再起動します。
# systemctl start httpd
# systemctl enable httpd
http://192.168.1.50/
を(リモート)ブラウザで確認したら、
http://192.168.1.50/wp-admin/setup-config.php
WordPressへようこそ。始める前に、以下の項目を知っておく必要があります。・・・
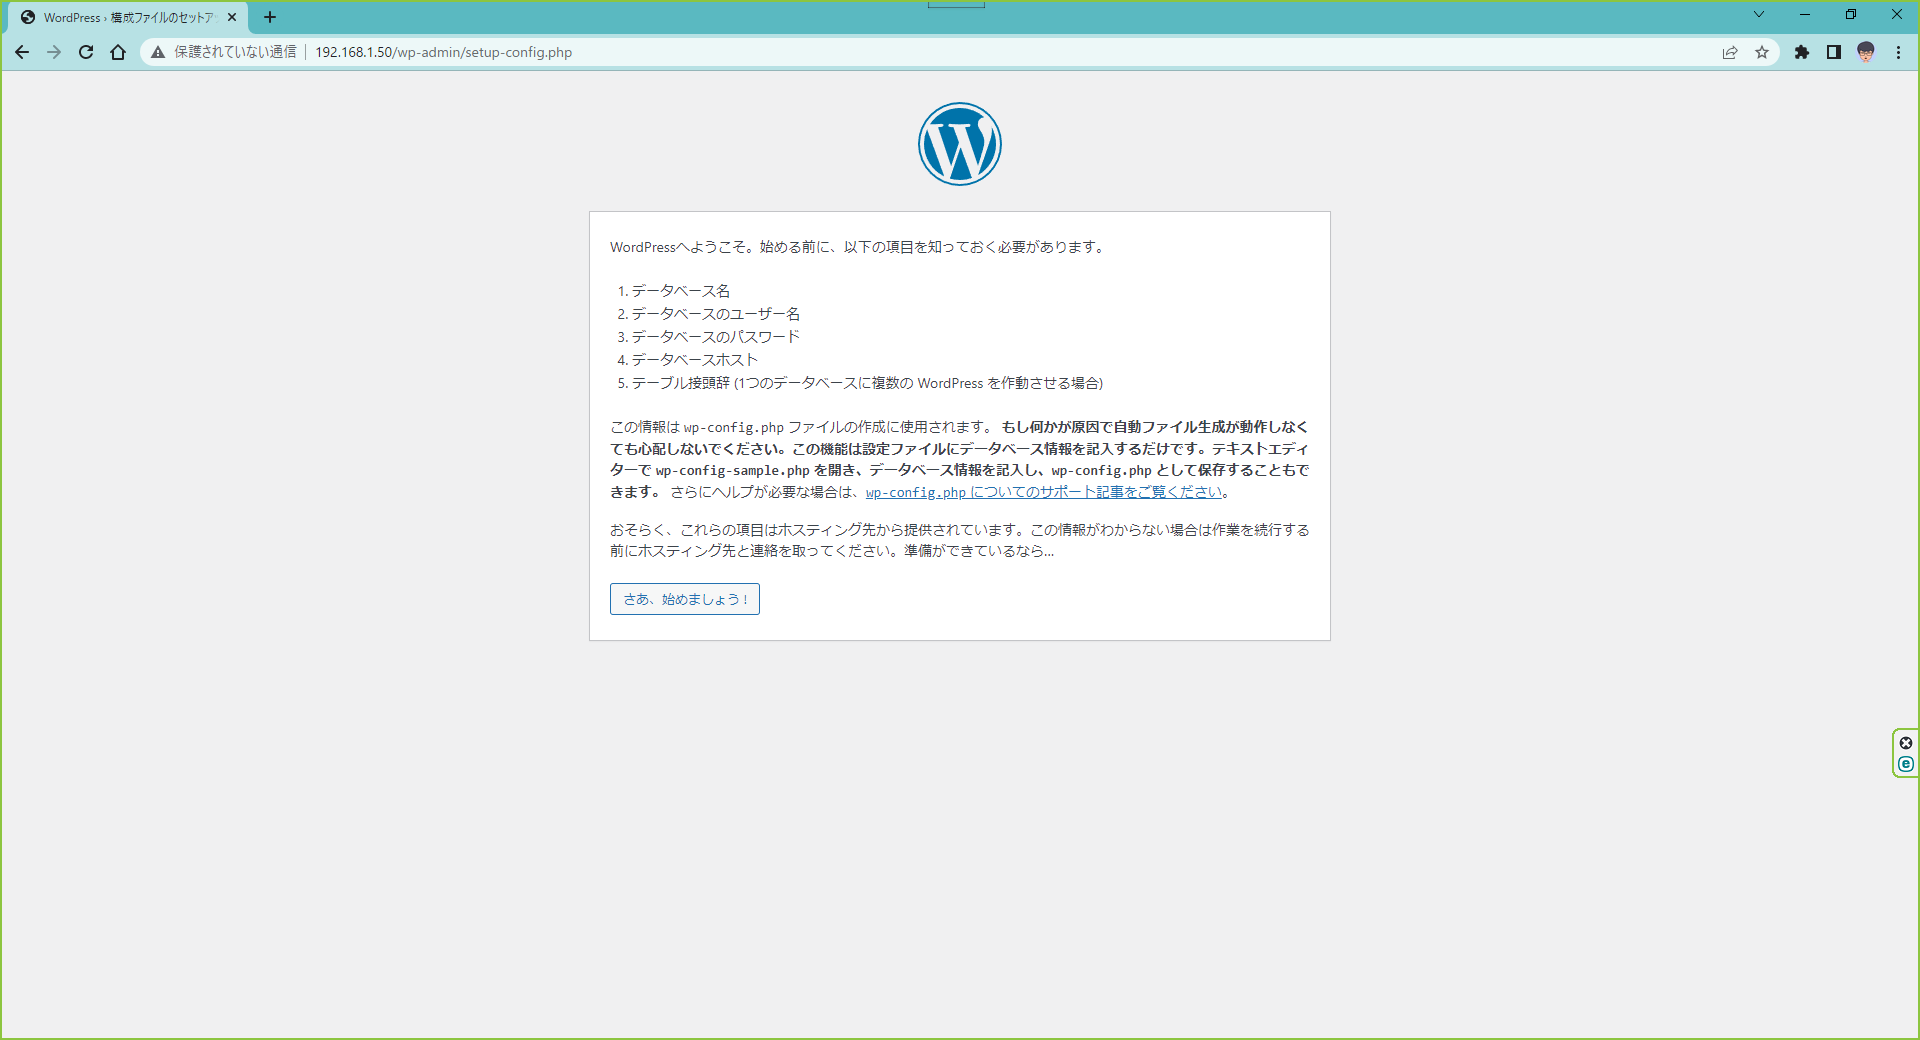
が表示された。
データベース名:wp
データベースのユーザー名:user2
データベースのパスワード:password2
データベースホスト:localhost
テーブル接頭辞 (1つのデータベースに複数の WordPress を作動させる場合):wp_
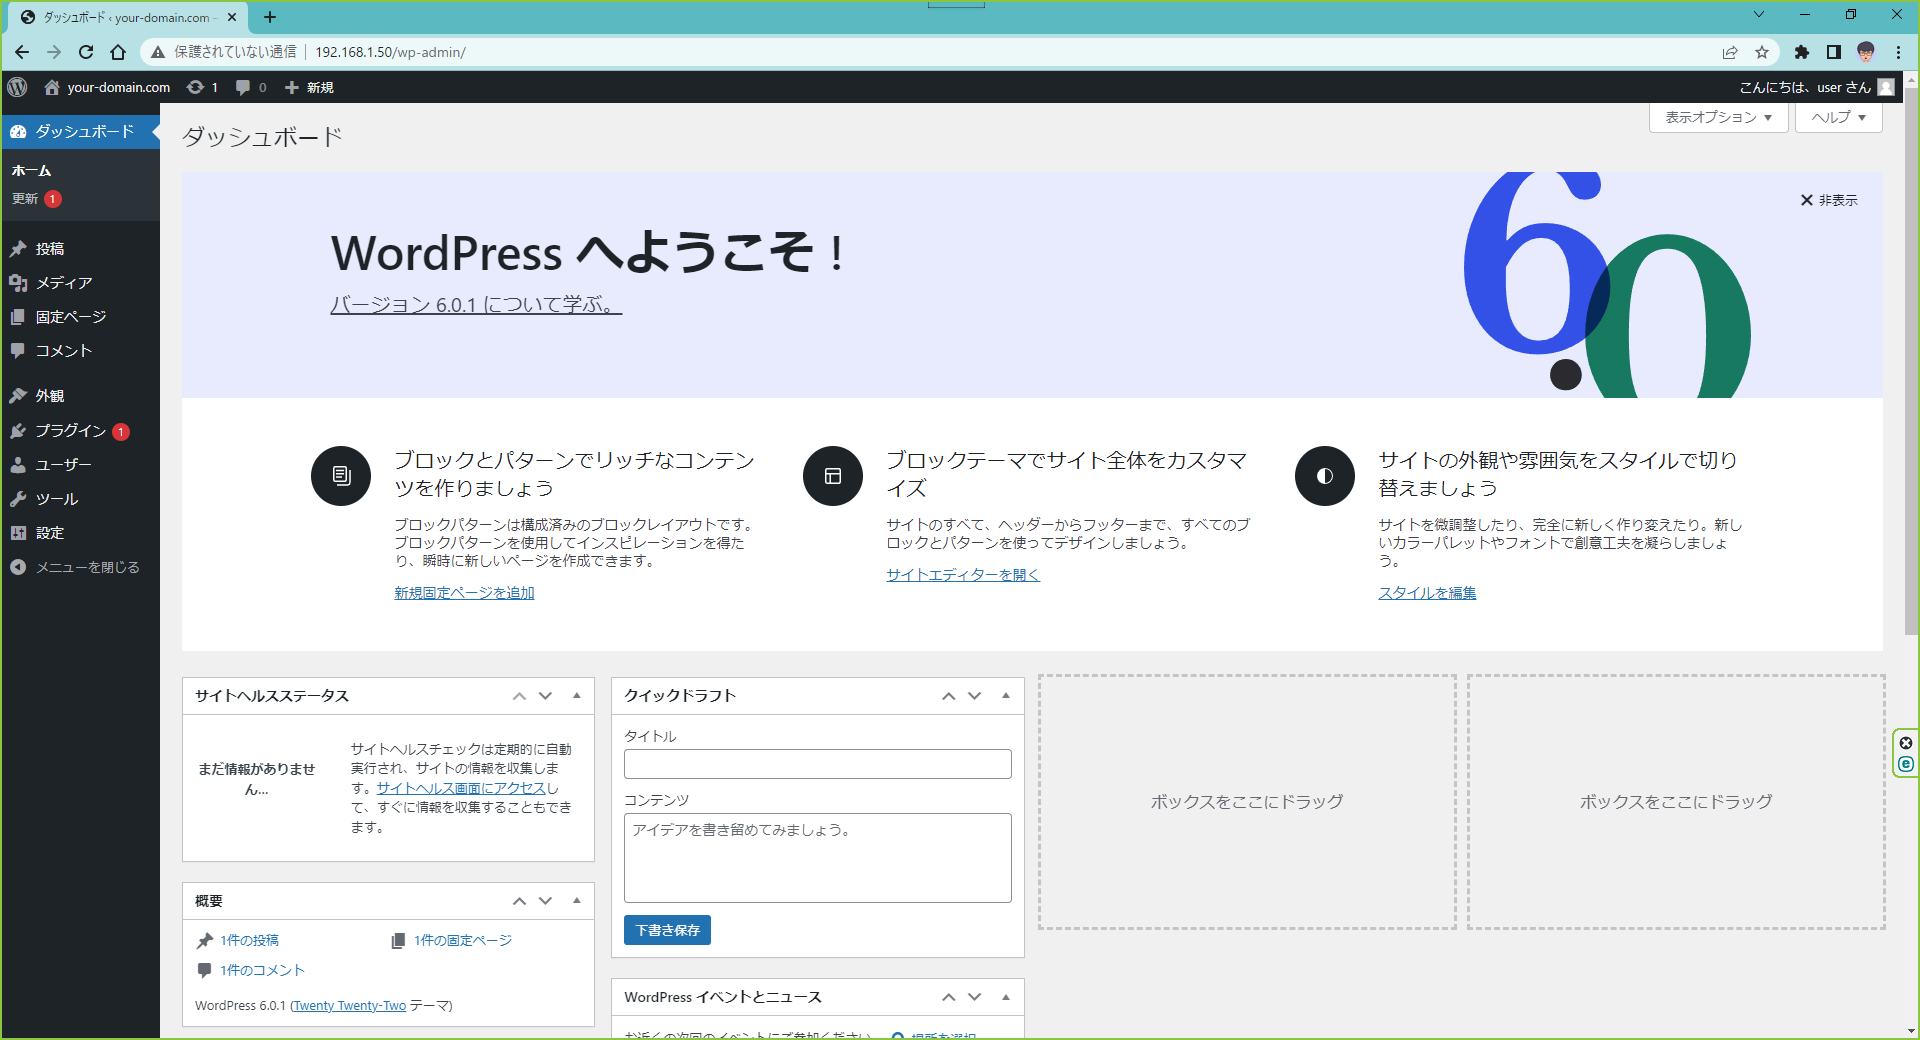
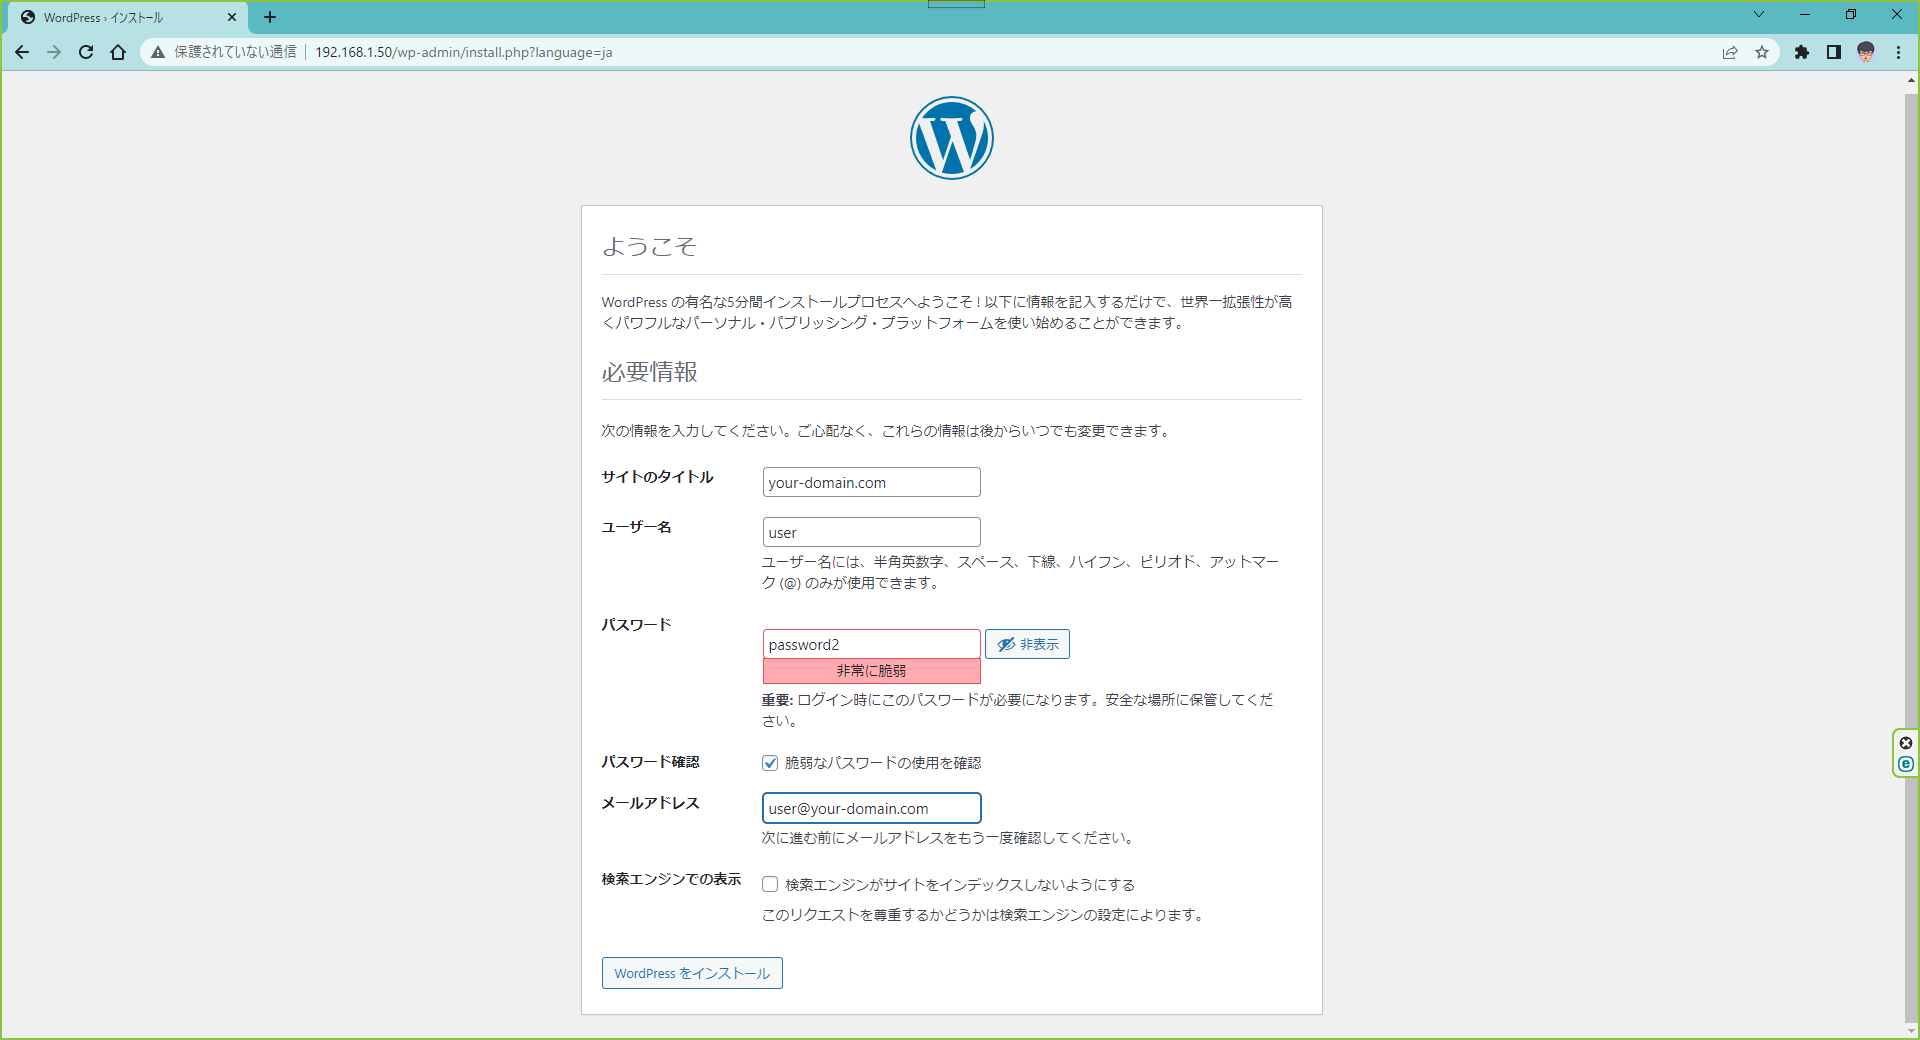
を確認し、後は画面の指示に従えば、インストールされ、設定画面にログインできます。
Views: 440